

By Ray Bernard, PSP, CHS-III
This half-day or early evening physical access control assessment is an important but rarely-done assessment action. It is worth doing as a standalone assessment as well as part of a larger site physical security vulnerability assessment.
It is quick and very revealing.
(A different perspective on this is conveyed by the alternative name for this type of assessment: Facility Physical Security Penetration Test. That was a popular name before cyber security rose to the level of importance it has today. Currently, penetration testing or “pen testing” refers to computer and network security, and so to prevent any possible confusion between the information security and physical security tests, I use “Time-to-Target” test as it sounds less invasive, and it focuses on an important aspect that is often not considered closely enough: the unauthorized entry time factor.)
Download the Assessment Guide
The PDF file document contains the exact assessment guidance that you see below on web page, but of course you don’t have to go online to read it. Download the 6-page assessment guide here:
Do-It-Yourself Time-to-Target Assessment version 1.0
Why Do This Assessment?
There are several reasons for doing this assessment:
- It will show how many layers of security you have (such as access control, video surveillance, and observation by people) between building entry points and critical asset locations.
- It will make clear the roles that the layers of security play in Prevention, Deterrence, Detection, Delay and Response along with the relevant time factors in an unauthorized entry scenario.
- It provides a basis for thinking about security improvements in your capabilities for Prevention, Deterrence, Detection, Delay and Response. Or you may simply achieve validation of a need you already know about, which can help getting funding approved.
- It can validate the existing good security controls you have in place.
- You can easily delegate this assessment to someone on your team, and get swift and well-guided execution.
Most facilities are surprised to learn how quickly it is possible to access critical areas, including executive offices and HR. The Time-to-Target assessment encompasses both insider and outsider threat considerations.
You can perform this as a one-person assessment; it usually goes faster if one person leads and inspects the doors and path areas, and the other person times and documents the actions.
Often, but not always, you will get surprising results. We once found a 30-second pedestrian street-to-airside path at an airport, which—due to construction—did not require the use of any access card reader. In another case we found a 6-second path from the sidewalk to the office of the VP of HR, at a site that was planning a 10 percent workforce reduction. (By the way, the company relocated the VP of HR’s office prior to the personnel reduction.)
Time-to-Target Assessment
Simplest Approach
Worst-case likely threat actors are insiders who have authorized access, and outsiders who are skilled at opening locked doors or who have obtained an access card that will provide them entry. Disgruntled employees can often tailgate/piggyback their way in even after their card access has been cancelled.
For this kind of assessment, it is usually easiest to record the timing for card-based access (i.e. use your own access card rather than, for example, taking the door off the hinges). If you want to take other kinds of forced access into account, that can be done easily enough after the timed access testing is completed. It’s a simple matter to time removing a door (or whatever else you want to do), and then incorporate that timing in your assessment documentation.
Assessment Steps
Preparation
- Download a stopwatch app. Download a stopwatch app to your smartphone, or a clock app that has a stopwatch mode. Make sure it uses large numbers, which facilitate faster use, and that it’s easy to start, pause, continue and stop. Use a stopwatch number display that displays the seconds to two decimal places, such as 1.50 for a second and a half-second.
-
Obtain a Notepad. Obtain a pad with lined paper. I have found it easiest to use a small pocket-sizes notepad when working alone, but that means you have to write smaller to fill out the page. If you are checking a lot of paths and using two people, a letter-sized pad will probably be handier for recording start/stop times and note taking. Figure 1 below shows how you set up the pages at the start of the assessment. Figure 2 further below shows what a filled-out page looks like. (The label PATH/SEG # for the first column stands for Path Segment Number.)
Figure 1. Example Path Time Record Page (Upper Half of Page)

- Small screwdriver. A small screwdriver about 6” long can be used to test the ability of an intruder to defeat the door latch.
- Target Asset Selection. Make a list of the target assets locations. HR and senior executive or manger offices should be on the list. It should include whomever an employee might blame, rightly or wrongly, for an employment termination.
- Building Entry Points. Make a list of building entry points. Any building perimeter door should be included if it leads to internal areas from which there are paths to the target locations. Roof hatches, skylights and openable windows also count as entry points; so if you have a lot of those the execution time factor will increase. Treat a cafeteria as an entry point if unescorted visitors are allowed to use it. Treat an internal public business area as an entry points if it is possible to socially engineer (such as for restroom use) or force further entry from the area. This would include payment windows, job application windows, delivery driver waiting areas, or visitor waiting areas. Action by a disgruntled individual in such areas could be triggered by any number of things and so it is worth considering such areas as “entry points” for the sake of the timing elements of the test. There is little to no value in timing activities prior to the decision point to take action.
- Path Planning. Obtain a floor plan map for the floors containing access path elements. Letter sized emergency exit maps are usually sufficient.
Floor Maps
- Paths and Path Segments. Draw lines to indicate each paths that you want to test. Sometimes hallways are a common path element of many paths. For hallways, stairways and other common areas with two or more paths, be sure to draw a separate path line for each path’s segment in the common area. You want to be able to follow a single path line for each path.
- Path Sequence. Determine the order in which you will walk the paths, and number them in that order by labeling the starting and ending points with a circled number.
- Path Segments. Mark a large dot on the map page for starting and ending points of path segments, including open hallways and stairways, which is especially helpful if they are part of more than one path. Label each path segment with the path number and a letter. For example, for path #3, label the first segment 3a, the second segment 3b, and so on. This is the number that will go into the PATH/SEG # column on the notepad. (PATH/SEG # stands for Path Segment Number.) The reason for labeling segments is that you can be interrupted while walking the paths, which throws off the timing. Timing individual path segments means that you minimize the portions of the path you have to do over if you get interrupted.
- Target Area Names. Write the target asset or target area name at the end of each path.
That completes the Floor Map preparation work. Next comes the creation of the Time Record Pages.
Time Record Pages
-
Create the notepad Time Record Pages. (If you haven’t done that already.) You will use one page for each Path. In the center at the top of the page, draw the path number and circle it. To the left of the circle write “Time to Target:”. To the right of the circle, write “Target Asset:”, followed by the Target Asset’s name. Then draw four vertical lines on the page to create five columns, as explained next. On a letter-sized pad, starting at the left side of the page, create columns by drawing four lines that are about 1-inch apart. This creates four narrow columns and one large column. Label the columns from left to right: PATH/SEG #, START, STOP, TIME, NOTES. The NOTES column is where you write down anything of security importance that you see during the assessment. For example, which parts of the path have video surveillance coverage, and which don’t.
Figure 2. Completed Example of Path Time Record Page (Upper Half of Page)
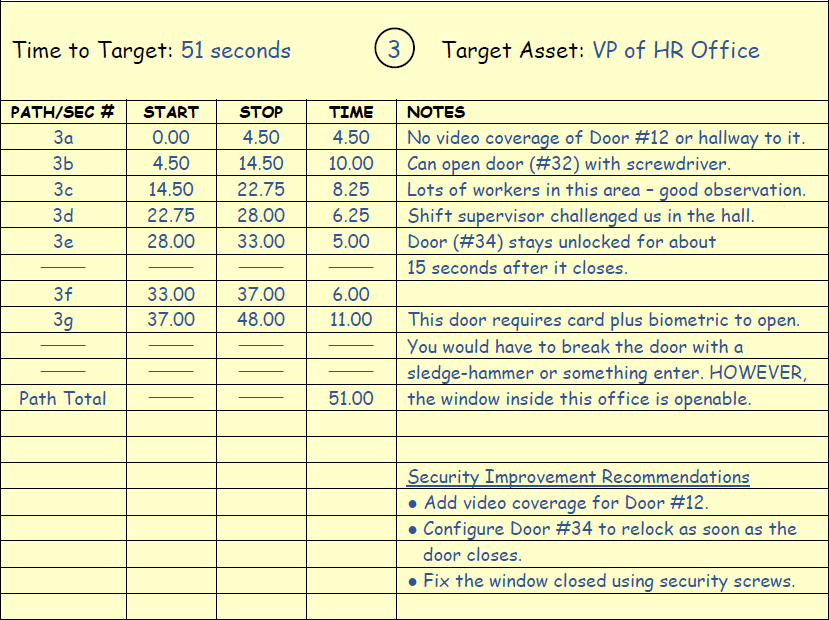
- Write in the Path Segment Numbers. On each page, in the first column, write the Path Segment Numbers in order. For example, for Path #3, write 3a on the first line in the PATH/SEG # column, 3b on the second line, and so on. Immediately after the row for the last path segment, write Path Total in the PATH/SEG # column.
That completes the Time Record Pages preparation work.
Pre-Test Considerations
These are some things to take into account prior to performing the assessment walkthroughs.
- If you are not familiar with the path areas, it is worthwhile to walk them ahead of the test to identify any issues that you may have to deal with during the test execution.
- If you own access card does not permit entry into some areas, you will need to enlist the assistance of someone to assist you with entry into those areas.
- If your facility has clean room areas, or areas under construction, you may require personal protective equipment (PPE) such as glasses, caps, hard hats, shoe covers, and so on. If this equipment is not provided by a PPE station near the area, you’ll have to arrange getting the equipment in advance.
- If you are doing any portion of the walkthrough after normal business hours, consider bringing a flashlight; not all path segments may be well enough lit.
Test Execution
- Start walking the Paths. With the stopwatch app, the notepad and the floor plan maps in hand, begin timing the paths in path number order.
- For each Path. Write in the START and STOP times in seconds to two decimal places, like “1.50” as indicated on the stopwatch. (You will calculate the start and stop time interval later, after walking the path.) Make notes about video surveillance along the path, and also about the presence of personnel who might observe and recognize an unauthorized individual. These notes will be input into thinking about people and process security measures, in addition to technology. (For example, many organizations have policies about prominently wearing the company Security ID badge. Some companies have security badges that are color coded according to their work areas and levels of access privilege, to facilitate detecting someone in the wrong work area.)
-
For each door in the Path.
For locked doors, test the functionality of the door lock mechanism.- Can the door be closed slowly so that it doesn’t actually latch?
- If the door doesn’t latch closed, does the system alarm?
- Once you present a card, does the door remain unlocked for a period of time (bad), or does it relock immediately (good)?
- For seldom used doors, can duct tape or other tape be used to keep the door from latching (by making a small blob of tape and stuffing it in the strike plate opening)?
- Does the door’s deadlocking plunger work correctly? (See the deadlocking plunger illustrations and video.)
Write the results of the door test in the NOTES column. Include any other relevant information, such as the door number of a door that was tested.
- After walking each Path. Go back through the notepad chart and calculate the time for each path segment using the START and STOP times, writing the path segment time in the TIME column. Then add up the values in the TIME column and put the total in the TIME column of the Path Total row. Write the Path Total time to the right of the Time to Target label on the top left of the page.
Test Documentation
Use the remainder of the available NOTES lines to document recommended security improvements. Follow up as appropriate to get the security improvements approved and implemented.
It is a good idea to also write a Time-to-Target Assessment Summary page that includes:
- Brief description of the test
- Noteworthy observations and conclusions
- Summary of the recommendations developed, or if none are needed, a statement of that fact.
- Time factors in addition to the overall Time-to-Target, such as Time-to-Observation, Time-to-Challenge, Time-to-Alarm, Time-to-On-Site-Response, and Time-to-Remote-Response. The purpose for considering these other factors is to take the full security controls picture into account—people, process and technology.
The summary page data is useful information to include if any improvements need formal approval or funding.
Questions or Feedback on this Document
If you have any questions or feedback about this document, please to get in touch with me through our contact page or by phone (949-681-9814). Good luck in your Time-to-Target testing!
New Targeted Assessment Material
As we collect and create new targeted assessment materials here at RBCS, we will expand this page to provide access to them. Sign up below to be notified of updates to this and related pages.